This has been a busy month and the last week of it is only going to get busier! I'm co-hosting a Halloween party that will also serve as my Betrothed's birthday party this weekend, which means I have lots of planning and baked goodies ahead.
But for now, I must share this cute little gnome cake that I made a little bit ago. I never thought I'd ever say that, but I'm definitely glad I took the challenge. The cake was for my very tall, very good friend, Joe. He loves to call out other people's height challenges (for example: he calls me "Shortness"). But it's all out of love, so I let it slide (for now mwahahaha). Rather, he was ordering it for his mom.
I made a 6" yellow cake as the tree stump. I made it from scratch, but I'm not sure about revealing the recipe just yet because I may have to shop around for a better recipe. If anyone has any recipe suggestions for yellow cake, I am totally open to trying them!
So anyhoo, I made a half batch of rice treats and molded a basic gnome shape. I attached the different parts with a bit of icing. Then I ate the rest (hey I didn't want to waste it!)
Then I added a thin layer of buttercream to the outside, and I covered each part from the bottom up. After I got the basic parts covered, I went back and added hair, arms and an apron as well as a pair of glasses made from thick fondant circles and vermicelli.
I was happy with how it turned out! I think the gnome challenge was successfully completed!
Luckily Joe's mom has an awesome sense of humor, so she liked the cake. :)
Feel free to email any news, videos, recipes, or just about anything to mysweetdiversion(at)hotmail(dot)com!
Monday, October 22, 2012
Gnome Cake
Tuesday, October 2, 2012
Once Upon A Time Cake!
Evening, all!
So I am a new fan of the ABC series Once Upon A Time. It has all of the classic fairy tale characters-- plus a twist. I love it! So when I was commissioned to make a cake with this theme, I was all for it!
I started with my now- trusty chocolate cake recipe (the cake was to be a 6" cake, so I used the rest of the batter to make 24 yummy mini cupcakes). Then I filled the layers with my trusty cream cheese buttercream recipe. I planned on using an edible image, so I iced the cake in regular white buttercream.
After a bit of thought, I went with a few key symbols from the show: The evil queen's mirror, her bowl of apples, Snow White's poisoned apple (complete with a little bite), the Mad Hatter's hat, and the fairy tale book that started it all called Once Upon A Time. I added some black swirls on the side (which my friend pointed out looked like the mayor's office), and voila!
I must add that my scrollwork has greatly improved. I feel like I've added much Caking XP to my repertoire-- perhaps enough to gain a level. :)
Side note: I'm, super excited about the second season that premiered this past Sunday. Can't wait to see how the story unfolds!
Oh, and look out for some delicious fall flavors soon! ;)
So I am a new fan of the ABC series Once Upon A Time. It has all of the classic fairy tale characters-- plus a twist. I love it! So when I was commissioned to make a cake with this theme, I was all for it!
I started with my now- trusty chocolate cake recipe (the cake was to be a 6" cake, so I used the rest of the batter to make 24 yummy mini cupcakes). Then I filled the layers with my trusty cream cheese buttercream recipe. I planned on using an edible image, so I iced the cake in regular white buttercream.
After a bit of thought, I went with a few key symbols from the show: The evil queen's mirror, her bowl of apples, Snow White's poisoned apple (complete with a little bite), the Mad Hatter's hat, and the fairy tale book that started it all called Once Upon A Time. I added some black swirls on the side (which my friend pointed out looked like the mayor's office), and voila!
I must add that my scrollwork has greatly improved. I feel like I've added much Caking XP to my repertoire-- perhaps enough to gain a level. :)
Side note: I'm, super excited about the second season that premiered this past Sunday. Can't wait to see how the story unfolds!
Oh, and look out for some delicious fall flavors soon! ;)
Wednesday, September 26, 2012
Made - from - scratch Chocolate Cheetah Cake
Hello, all! I've been on a bit of a hiatus as of late, but hopefully, I'll have a few more projects trickling in as the season goes on (it is that pumpkin time of year, after all!)
Today is my good friend, Leigh Ann's birthday. We had a celebration for her over the past weekend, and I'm very proud to share this cake for two reasons: 1) I made a successful, super-moist chocolate cake from scratch and 2) I made my first cheetah print cake!
The recipe is from Taste of Home and can be found here. The recipe is as follows:
2) Sift together the dry ingredients into your mixer's bowl and turn on low for a few seconds to combine. In a separate bowl, mix together the coffee, milk, and oil.
3) Add the coffee mixture into the dry mixture and mix at medium for 1 minute. Then add eggs and vanilla. Beat 2 more minutes. **The batter will be super thin-- just trust it!**
4) Pour batter into two 8" pans (the batter fits perfectly into these-- no boil over!) and bake for 25-30 minutes.
5) Cool cakes for 10 minutes in pans, then turn them out onto a cooling rack.
See? Two perfectly moist cakes. Yum!
To decorate, I mixed some golden yellow vanilla buttercream and frosted the cake. Then I pinched together different sized blobs of black and brown fondants to create cheetah spots.
I made sure that the black fondant peeked out around the edge of each spot.
Then I repeated until the whole cake was covered in spots.
Leigh Ann is a huge fan of pink, so of course I had to add some pink elements. I decided to add pink roses at the top and some pink white chocolate numbers.
Here's a bit of detail on the top...
Leigh Ann liked the cake and she was totally taken by surprise because she didn't know about it! :) And I must say, this chocolate cake recipe is definitely a keeper!
Happy birthday, Leigh Ann!!
Today is my good friend, Leigh Ann's birthday. We had a celebration for her over the past weekend, and I'm very proud to share this cake for two reasons: 1) I made a successful, super-moist chocolate cake from scratch and 2) I made my first cheetah print cake!
The recipe is from Taste of Home and can be found here. The recipe is as follows:
- 2 c AP Flour
- 1 tsp salt
- 1 tsp baking powder
- 2 tsp baking soda (don't get those two mixed up, like I usually do!)
- 3/4 c baking cocoa
- 2 c sugar
- 1 c canola oil (not a healthy cake, but moist!)
- 1 c brewed coffee
- 1 c milk
- 2 eggs
- 1 tsp vanilla extract
2) Sift together the dry ingredients into your mixer's bowl and turn on low for a few seconds to combine. In a separate bowl, mix together the coffee, milk, and oil.
3) Add the coffee mixture into the dry mixture and mix at medium for 1 minute. Then add eggs and vanilla. Beat 2 more minutes. **The batter will be super thin-- just trust it!**
4) Pour batter into two 8" pans (the batter fits perfectly into these-- no boil over!) and bake for 25-30 minutes.
5) Cool cakes for 10 minutes in pans, then turn them out onto a cooling rack.
See? Two perfectly moist cakes. Yum!
To decorate, I mixed some golden yellow vanilla buttercream and frosted the cake. Then I pinched together different sized blobs of black and brown fondants to create cheetah spots.
I made sure that the black fondant peeked out around the edge of each spot.
Then I repeated until the whole cake was covered in spots.
Leigh Ann is a huge fan of pink, so of course I had to add some pink elements. I decided to add pink roses at the top and some pink white chocolate numbers.
Here's a bit of detail on the top...
Leigh Ann liked the cake and she was totally taken by surprise because she didn't know about it! :) And I must say, this chocolate cake recipe is definitely a keeper!
Happy birthday, Leigh Ann!!
Tuesday, September 4, 2012
Jack Skellington and Cow Cakes!
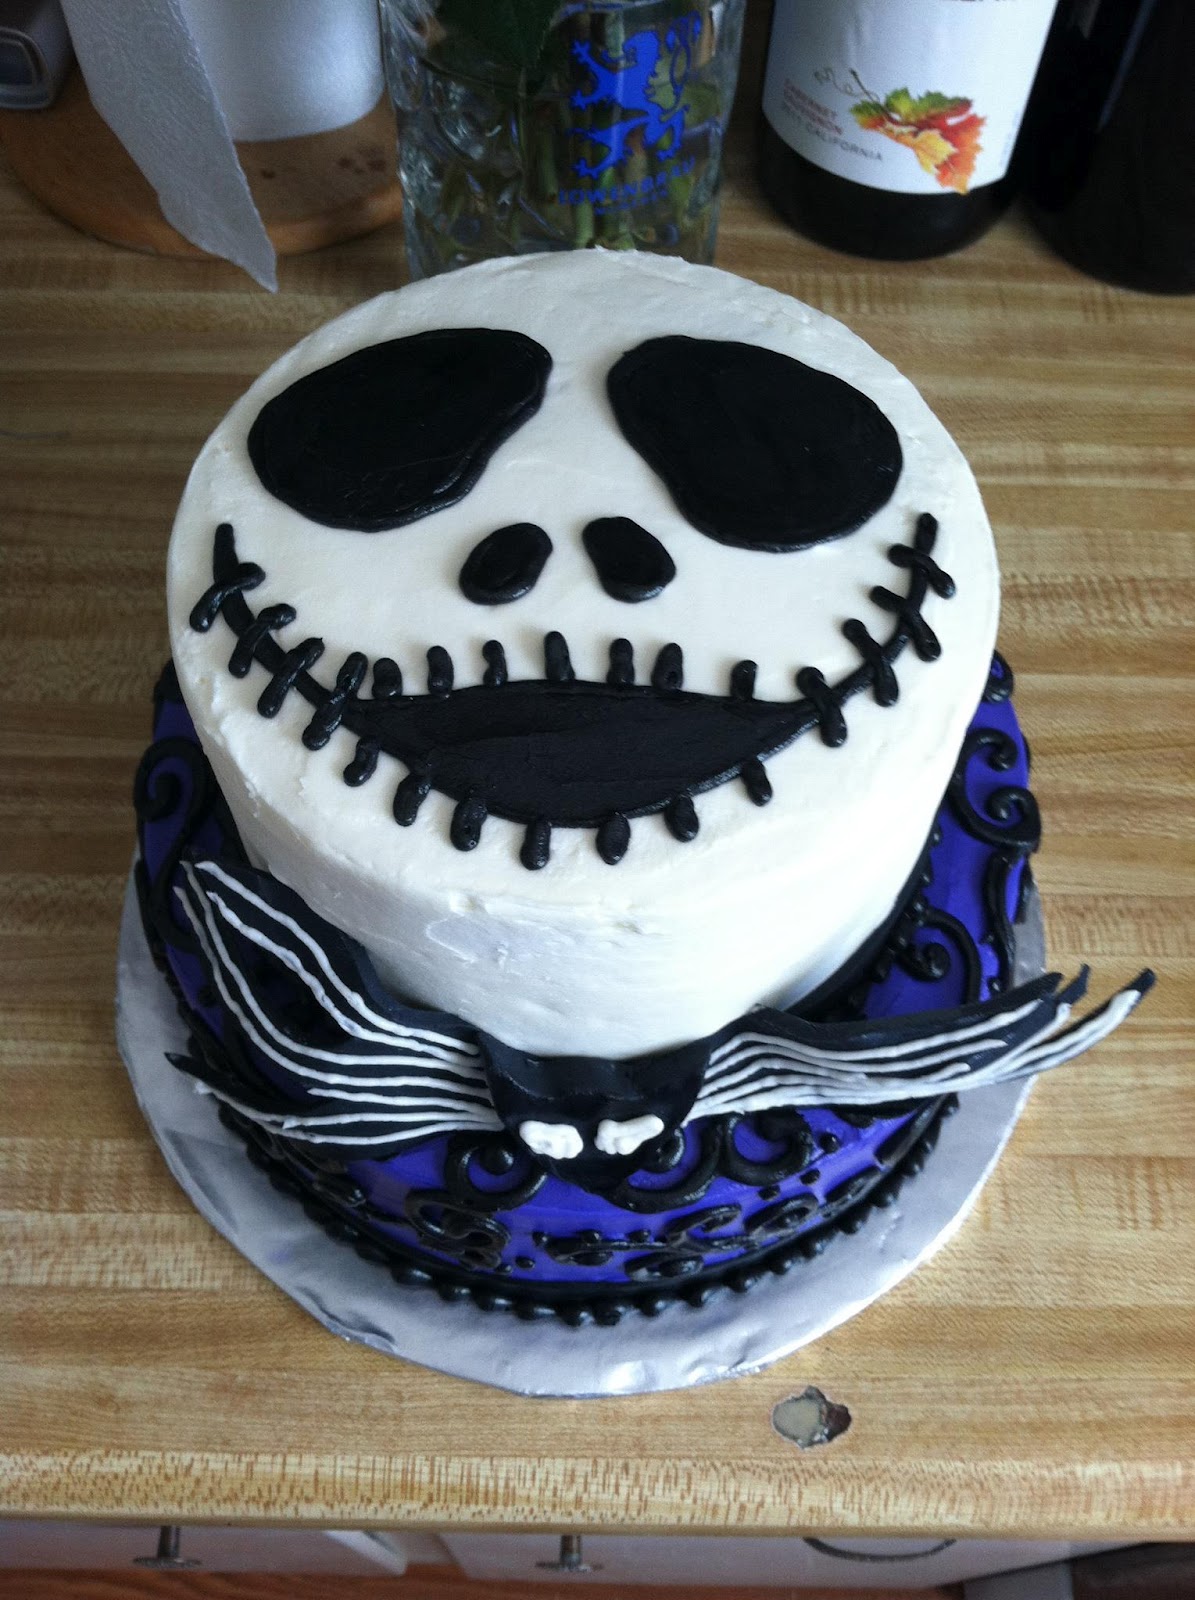
This past week or so, there have been a LOT of birthdays, including mine! I had a joint birthday party with my good friend, Jessica, and I made us a cake (of course). We are huge fans of Tim Burton's Nightmare Before Christmas, so I decided to make a simple little cake that pays homage to the film.
The cake was strawberry cake with cream cheese filling on the bottom tier and vanilla buttercream filling on the top tier. It tasted great, and Jessica liked it, so my mission was accomplished. :) And based on the amount of cell phone cameras that snapped my cake as well as the amount of empty plates, I think the partygoers liked my cake inside and out!
The next cake was for one of my oldest friends, Ainsley. We go way back to 7th grade! And her love for cows hadn't changed, so I decided to make her a cute cow cake. She is also a fan of almond pound cake, so I found a recipe from Paula Deen for Almond Sour Cream Pound Cake. Yum!
In order to make two 6" layers and two 8' layers, I multiplied the recipe by 1.5
In the mixer, cream together the sugar and butter then add sour cream.
Sift the flour and baking soda together in a separate bowl then add alternately, 1 at a time, with the eggs (yes all 9 of them!)
Add extracts then stir to combine them. Pour the batter evenly into the pans then bake! For me, the 6" cakes took about 50 minutes, and the 8" cakes took 1 hour. But ovens vary, so check your cakes!
Cool the cakes in their pans for 10 minutes, then turn them out onto cooling racks.
As for the buttercream, I used my usual vanilla buttercream recipe and added almond emulsion to it (I added enough to taste). I wanted to accentuate the almond-y-ness, since it seems the flavor got a bit lost in the baking of the cakes. But then again, I love almond cake, so add almond flavor to where you can stand it.
I filled and covered the cakes in the white buttercream, then cut out thin asymmetrical shapes out of black fondant to represent cow spots.
I then made a little cow to go on top. *Note: I have no clue what the specifics of a dairy cow are, so I ended up making a male-female hybrid. It had horns and an udder!
Still cute though, right?
I added some blue borders and writing (Ainsley's favorite color is blue--that had not changed, either)
Then lastly, I added white chocolate numbers that I spotted with black buttercream. There was no doubt this was a definite cow cake!
Unfortunately, the numbers didn't make the ride over to her house because of the horrible heat, but the cake was still loved. :) And it tasted awesome! Yay for scratch baking!
The cake was strawberry cake with cream cheese filling on the bottom tier and vanilla buttercream filling on the top tier. It tasted great, and Jessica liked it, so my mission was accomplished. :) And based on the amount of cell phone cameras that snapped my cake as well as the amount of empty plates, I think the partygoers liked my cake inside and out!
The next cake was for one of my oldest friends, Ainsley. We go way back to 7th grade! And her love for cows hadn't changed, so I decided to make her a cute cow cake. She is also a fan of almond pound cake, so I found a recipe from Paula Deen for Almond Sour Cream Pound Cake. Yum!
In order to make two 6" layers and two 8' layers, I multiplied the recipe by 1.5
- 3/4 pound butter (3 sticks)
- 4 cups sugar (** I changed this from 4.5 because I didn't want the cake overwhelmingly sweet)
- 1 1/2 c sour cream
- 4 1/2 c AP flour, plus more for pans
- 3/4 tsp baking soda
- 9 eggs (I made sure they were room temp)
- 3/4 tsp vanilla extract (I changed this from the orange in the original recipe)
- 1 tsp almond emulsion (I liked the almond flavor from the emulsion rather than extract)
In the mixer, cream together the sugar and butter then add sour cream.
Sift the flour and baking soda together in a separate bowl then add alternately, 1 at a time, with the eggs (yes all 9 of them!)
Add extracts then stir to combine them. Pour the batter evenly into the pans then bake! For me, the 6" cakes took about 50 minutes, and the 8" cakes took 1 hour. But ovens vary, so check your cakes!
Cool the cakes in their pans for 10 minutes, then turn them out onto cooling racks.
As for the buttercream, I used my usual vanilla buttercream recipe and added almond emulsion to it (I added enough to taste). I wanted to accentuate the almond-y-ness, since it seems the flavor got a bit lost in the baking of the cakes. But then again, I love almond cake, so add almond flavor to where you can stand it.
I filled and covered the cakes in the white buttercream, then cut out thin asymmetrical shapes out of black fondant to represent cow spots.
I then made a little cow to go on top. *Note: I have no clue what the specifics of a dairy cow are, so I ended up making a male-female hybrid. It had horns and an udder!
Still cute though, right?
I added some blue borders and writing (Ainsley's favorite color is blue--that had not changed, either)
Then lastly, I added white chocolate numbers that I spotted with black buttercream. There was no doubt this was a definite cow cake!
Unfortunately, the numbers didn't make the ride over to her house because of the horrible heat, but the cake was still loved. :) And it tasted awesome! Yay for scratch baking!
Labels:
almond,
birthday,
cow,
fondant,
Jack Skellington,
paula deen,
pound cake,
swirl
Wednesday, August 22, 2012
Cute Cakes : First Birthday and Baby Shower
Good evening, everyone! As I patiently await the results of the Threadcakes competition, I am here to share a couple of cute cakes I've made in the past week! One of them is a monkey-themed first birthday cake.
It was a huge 12" vanilla cake with a little vanilla cupcake as the "smash cake." The design was based on the serveware for the party.
The cake was a success, and the little guy loved it!
Some parts of the invitation had glitter accents, so I thought it would be fun to add some clear disco dust (love that stuff!)
I must say that I am very proud of this one. I think that I am getting much, much better at my stacked cakes, which will come in handy when I make my huge cake masterpieces in the future. :)
And I have one more cake to make this week: my own birthday cake! Yes, my 26th birthday is tomorrow! My good friend Jessica (who turned 25 this past Monday) and I are celebrating Saturday with a joint birthday party! I'm still not quite sure what to do design-wise, but I'll try to think of something awesome! :)
It was a huge 12" vanilla cake with a little vanilla cupcake as the "smash cake." The design was based on the serveware for the party.
The cake was a success, and the little guy loved it!
My second cake was for a baby shower for a baby boy. I was to construct a 3-tier cake that matched the invitation.
I added some icing booties and little fondant rubber duckiesSome parts of the invitation had glitter accents, so I thought it would be fun to add some clear disco dust (love that stuff!)
I must say that I am very proud of this one. I think that I am getting much, much better at my stacked cakes, which will come in handy when I make my huge cake masterpieces in the future. :)
And I have one more cake to make this week: my own birthday cake! Yes, my 26th birthday is tomorrow! My good friend Jessica (who turned 25 this past Monday) and I are celebrating Saturday with a joint birthday party! I'm still not quite sure what to do design-wise, but I'll try to think of something awesome! :)
Monday, August 13, 2012
My 2012 Threadcake : "We're Not Savages"
Ahhh, yes. The time has finally come to reveal my Threadcake! I actually made this cake about two weeks ago, but my inner-procrastinator decided to submit my entry for the contest on the very last day of submission! My inner perfectionist is also stretching it out later because I have to find the right words to put in my description and the right photos to put in. Ack! I took a break to blog since I was already on the computer.
Let's see... where to start with this one... Ah! Well, I'll start with the T-shirt design from Threadless.
The shirt was to be a birthday gift of my good friend Joe, so I wanted to make a matching cake. The problem was I had never read Lord of the Flies, which is what this design is based on. I got into reading the book, which was quite riveting and entertaining. I wanted to make the cake from scratch, so I found a recipe here that was originally adapted from a Betty Crocker recipe. I added a bit more than a tablespoon of almond emulsion to each batch to make it tastier.
The cakes came out a bit denser than I thought, like a pound cake. But this ended up working out because I didn't want to use any inedible supports (part of the rules). I mixed up some caramel icing into my vanilla buttercream (love that flavor combo, as all of you may already know).
I filled and stacked my layers with the caramel buttercream then carved a skull shape out of cake.
I covered the cake in cream-colored fondant on the front for the skull and pink in the back because the mountain was made of pink rock in the novel. This part actually made the cake look like Donkey Kong, so I didn't bother taking a picture of it at this point!
I got to work on the figures, making Piggy, Ralph, and others. I must admit that it was the first time I actually sculpted little faces and bodies, so I was worried about how they would look. But I think they turned out great! The only support I used was uncooked thin spaghetti (glad I had that lingering in my cupboards!)
Next I made the bodies and the little details like the teddy bear and the infamous conch...
Next, I placed the figures on the cake, using more uncooked pasta.
I filled in the spaces with trees and bushes and covered the board with edible sand (brown and white sugar mixed).
Some detail shots...
And the cake was a hit at the birthday dinner! Joe loved it!
Happy birthday, Joe!
The link to my official Threadcake 2012 entry is here! :)
Let's see... where to start with this one... Ah! Well, I'll start with the T-shirt design from Threadless.
![]() |
| Courtesy of Threadless.com |
The cakes came out a bit denser than I thought, like a pound cake. But this ended up working out because I didn't want to use any inedible supports (part of the rules). I mixed up some caramel icing into my vanilla buttercream (love that flavor combo, as all of you may already know).
I filled and stacked my layers with the caramel buttercream then carved a skull shape out of cake.
I covered the cake in cream-colored fondant on the front for the skull and pink in the back because the mountain was made of pink rock in the novel. This part actually made the cake look like Donkey Kong, so I didn't bother taking a picture of it at this point!
I got to work on the figures, making Piggy, Ralph, and others. I must admit that it was the first time I actually sculpted little faces and bodies, so I was worried about how they would look. But I think they turned out great! The only support I used was uncooked thin spaghetti (glad I had that lingering in my cupboards!)
Next I made the bodies and the little details like the teddy bear and the infamous conch...
Next, I placed the figures on the cake, using more uncooked pasta.
I filled in the spaces with trees and bushes and covered the board with edible sand (brown and white sugar mixed).
Some detail shots...
And the cake was a hit at the birthday dinner! Joe loved it!
Happy birthday, Joe!
The link to my official Threadcake 2012 entry is here! :)
Subscribe to:
Posts (Atom)