Feel free to email any news, videos, recipes, or just about anything to mysweetdiversion(at)hotmail(dot)com!

Wednesday, May 30, 2012

Chocolate Chip and Peanut Butter Chocolate Chip Cookies!

Evening, all! So I know I talk about it a lot, but Pinterest is one of my favorite websites. I have found many recipes, cake inspiration photos, and even workouts on this site. I have run into quite a few chocolate chip cookie recipes that claim that they are "the best." I clicked on one, and found a recipe with an unusual ingredient-- corn starch. I found this interesting, and I decided to take the challenge (and, hey I could get some cookies out of it, if nothing else, right?) So the recipe is as follows and it makes about 3 dozen.

  • 3/4 c ( 1 1/2 sticks) unsalted butter, softened
  • 3/4 c brown sugar
  • 1/4 c white sugar
  • 1 egg
  • 2 tsp vanilla extract
  • 2c all-purpose flour (I used unbleached-- less flour-y taste)
  • 2 tsp corn starch
  • 1 tsp baking soda
  • 1/2 tsp salt
  • 1 c bittersweet chocolate chips
Preheat the oven to 350, and line a cookie sheet with parchment (not necessary, but I don't trust my cookie sheet sometimes).

In the bowl of a mixer, cream the butter and sugars together until fluffy and light.
Then add the egg and vanilla.
Mix in the flour, salt, corn starch, and baking soda.
Mix in the chocolate chips.
And resist the urge to eat.
Mmmmmmm
The original recipe suggests baking and enjoying, but I split my batter in half and added 1/2 cup peanut butter to one half. Again, resist the urge to eat.

Scoop out the dough in little tablespoonfuls and line them up on the cookie sheet.
Then bake for 8-10 minutes (no more than 10!)

allow them to cool on the sheet, on a rack for 5 minutes, then remove from the baking sheet and let them cool on the rack (if you can handle waiting that long).

Meanwhile, I rolled my excess cookie dough in separate parchment papers then wrapped them in plastic wrap.
Ready for the freezer!

The cookies (both varieties) came out quite fluffy and delicious.


Are they the best cookies, I've ever had? I must say, they are quite amazing (if you underbake them a little bit.) But perhaps, I need to eat a few more to really know...

Tuesday, May 15, 2012

Strawberry Shortcake Cake

Hello, all! This past weekend, I celebrated moms (and strawberry season) with this amahhhhzing Strawberry Shortcake Cake recipe! I wanted to do something special for my mom, but she's not a fan of the super-sweet butterceam. So I figured I'd try something with shipped cream-- and fresh fruit! This recipe is actually pretty easy. So easy, I made 2! One for my mom, and one for my Betrothed's mom.

I call this a cake because it starts with baking regular yellow cake. The traditional shortcake is more of a sweet biscuit-like dough baked to golden perfection and topped with strawberries and whipped cream. That is also very delicious, don't get me wrong (perhaps I shall try that recipe this summer as well), but I didn't want to fiddle with biscuit dough. This past weekend, I also had a graduation cake to make with Swiss Meringue Buttercream. Turned out awesome! And it made the 1.5 hour trip to Richmond, frozen and packed in a cooler!
VCU- my alma mater!
So, to make this strawberry-layered treat, start by baking yellow cake (I made 8" rounds). Then while the cakes are cooling, wash and slice your strawberries (about a pound container per 8" cake).
Then add some strawberry glaze, usually found with the strawberries in the grocery store. The glaziness is up to personal preference.

Set that aside. Time to whip up some whipped cream! Pour in 2 cups of heavy whipping cream into a chilled mixer bowl (make sure the whisk attachment has also been chilled). Then add about 5 Tablespoons confectioners sugar (more or less based on how sweet you want it) and 1 tsp vanilla extract.Then whip to stiff peaks!

Split the cake layers then place one split layer on the cake board and place a 4" wide plastic band (found in cake supply stores) around the cake tightly. Then secure with tape. Add a layer of the glazy strawberries (1/2 the mixture) then place another cake layer on top. Then add some whipped cream...

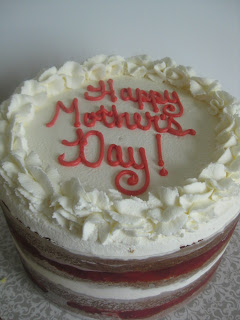
Then another cake layer. Then the rest of the strawberries, then the final cake layer. Fill the rest of the top with the whipped cream and add a border with a cupcake tip. Chill in the refrigerator to set the layers (or place in the freezer if you're short on time).

I added a bit of writing in red.
My mom loved her shortcake cake, and so did the rest of my family!

Mmmmm!
And a clean plate is always a great sign!
My mom had a very happy Mother's Day!

Sunday, May 13, 2012

Happy Mother's Day!!

Happy Mother's Day to all of the moms and single dads out there! I hope you all have a wonderful day! More on this strawberry shortcake cake soon!

Wednesday, May 9, 2012

Brown Sugar Bacon Cupcakes with Maple Buttercream

Good afternoon, all! It's definitely been a while since I posted. It's mainly because I've had a dry spell in cake orders. :( But I've also been busy at work. This past weekend, Roger (my Betrothed) celebrated the completion of his first year at law school! So I wanted to surprise him with a delicious treat made with something he loves. I've done the chocolate, the peanut butter, and even chocolate and peanut butter. So I went a bit more out of the box...

BACON!!

And speaking of "out of the box," I made these cupcakes from scratch! :)
  •  1/2 c bacon, cooked and chopped (about 8 pieces)
  • 2 Tbsp bacon grease, cooled
  • 1 c loosely packed dark brown sugar (you can also use light)
  • 1 large egg
  • 1 Tbsp vanilla extract
  • 3/4 c milk
  • 1/2 c (1 stick) unsalted butter, melted and cooled
  • 1 1/2 c all-purpose flour
  • 1 1/2 tsp baking soda
  • 1/4 tsp salt
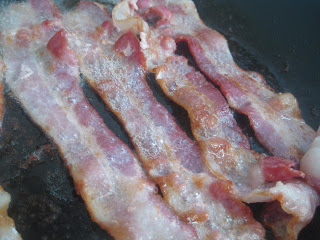
 First, start by frying up the bacon.
Save the grease and let it cool!
Also, melt the butter and let it cool.
Then preheat the oven to 350 and line your cupcake pans. This recipe was intended for 12 cupcakes, but I ended up with 15.

In a bowl the dry ingredients go. Then stir them with a fork to blend.

In a larger bowl, whisk the brown sugar and egg until smooth. Then slowly pour in the melted butter, bacon grease, vanilla,and milk, whisking until all is combined.
Add the dry ingredients and mix with a spoon until smooth.


Then fold in that chopped bacon!
Scoop the batter with a 1/4 c measure and bake for 16-19 minutes.
Check the bacon bits!
Yum!


While the cupcakes are cooling,candy some bacon to go on top. Toss 5 strips of bacon in 1/3 c of brown sugar and 1/2 tsp black pepper. Lay the bacon out on a parchment-line backing sheet and sprinkle the strip with the remaining brown sugar mixture.

Place another piece of parchment on top and another baking sheet on top of that, so that the bacon lays flat while baking. Bake at 325 for 20 minutes, then check the bacon. If it is still soft, place the bacon back in the oven for another 15 - 20 minutes. Remove top pan and parchment and let cool.
To make the maple buttercream, I added some prepared maple icing (found at cake supply stores) to my vanilla buttercream. Another alternative is adding 2 Tbsp of actual maple syrup to the buttercream, or adding maple flavor (although I don't know how authentic the flavor tastes).
 I added a drizzle of the leftover maple icing and some fudge icing (just for a little chocolate kick) and a piece of the candied bacon on top. These turned out amazing! :) I was super-excited that the cupcakes turned out awesome, and these will definitely go on the menu in my future bakery. :)

I also had a fun time making these cuppin' cakes. I felt like I was on Epic Meal Time, bacon-flippin', candying bacon, and a-drippin' that choc-uh-late sawse!

Congrats to Roger for completing his 1L year!
Related Posts with Thumbnails