Feel free to email any news, videos, recipes, or just about anything to mysweetdiversion(at)hotmail(dot)com!

Tuesday, July 26, 2011

Sushi Boat Cake


Hello, again! I am so excited to say that I am going on a mini vacation with my beloved, and it starts tomorrow afternoon! And I'm glad that I was able to finish my entry into another cake contest as well. This one was The Great Cake Contest sponsored by Disney Family Fun. I chose the "faux food" category and made a sushi boat cake! I started with yellow cake baked in a 13 x9 pan then cut it lengthwise and stacked the halves on top of each other. Then I carved the cake into a boat shape.
I carved out the middle then crumb-coated it...
Then covered in fondant...
Then I scored "boards" on the outside and inside of the boat and scratched wood-grain into it.


I mixed up some brown dye and some yellow dye into vanilla flavor (vodka works too!) and brushed it on.
It looks like wood now!
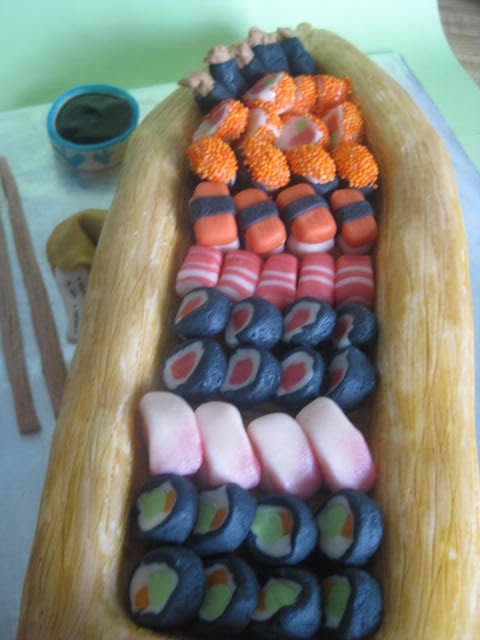
Then came the fun part-- the sushi! I mixed up some colored fondant that matched raw tuna and salmon. I also mixed up some orange and greens (carrots, cucumbers, wasabi) and made little fondant sushi rolls the way I would make regular sushi. For my "veggie roll," I rolled out logs of light green and orange. Then I bundled them together and rolled a thick layer of white over them (the "rice"). Then I rolled a thin layer of black over the whole roll (my "dried seaweed"). I cut the ends off then cut little slices with my X-acto knife. The little sashimi were easier, and I even dipped some rolls into orange nonpareil sprinkles (the "salmon "roe). Here are some details of the rolls...
A little pink petal dust for the yellowtail sashimi
I textured the outsides with crumpled foil!
My little hand rolls at the front of the boat :)
And, of course, I can't forget the pickled ginger and wasabi!

My finishing touches were a fortune cookie, chopsticks, and a little bowl of "soy sauce" (piping gel dyed brown and thinned out with a little water).
And here it is all put together. :)
I must say, I am very happy with how it came out! I won't find out the results of the contest until the end of next month-- fingers crossed til then!

And if you have any further questions about any of the rolls I made or techniques I used, feel free to comment or email! [mysweetdiversion@hotmail.com]

Wednesday, July 20, 2011

Cake with Gumpaste Roses


Hello, all! I've actually had this cake in my archives for a little while, and I thought I had already posted it! This was a little 6-inch cake that I had decorated with gumpaste roses and leaves. It looks like a mini-wedding cake, and since it's still wedding season, why not post it now? 

I iced and covered the little cake in white fondant, then made a little mound of fondant on top (I had some leftover yellow, so you'll see it in the side view) I started by making a large rose (for a refresher go here). I didn't have any wire or floral tape, so I stuck with toothpicks. I kept going with a few more, and stuck the roses into the mound then continued with progressively smaller roses cascading. On this particular cake, I made 4 large roses, 4 medium roses and 2 buds. I finished with leaves that I had cut out of green-tinted gumpaste. I folded them in half and let them dry on folded notecards (so they can hold their shape). I just chose little gaps to fill with leaves, then finished with a pearl border. Here are some more views...


One criticism that I would give the cake is that I am not really a fan of the leaves. Unfortunately, I only had one cutter, so they only came out to that one size. However, I went to my craft store and found this!

Courtesy Wilton.com
All those cutters! Can't wait to see what I can do with those...

Sunday, July 10, 2011

My Jelly Belly Cupcake Challenge Entry!


 I've been hard at work the past couple of days making an epic entry for the Jelly Belly Cupcake Challenge. I have finally completed it with twelve hours to spare (hey, I'm a recovering procrastinator), and I am totally excited about it! I wanted to originally make a cupcake rendition of Starry Night, but it had already been submitted, so I went for my second favorite painting, Edvard Munch's The Scream. I started by drawing a 5x7 grid on a print-out of the painting, then I arranged 35 cupcakes in the same grid pattern.
Then I colored some frosting peach and black then set to frosting the cupcakes using those base colors. Then I chopped up a bunch of Jelly beans, starting with black licorice flavor.

Then, I set to work placing the chopped jelly beans onto the cupcakes, making sure to follow the grid.
I wanted to make the figure's face and hands, as well as the boardwalk and shore in the background out of fondant. It allowed me to give them a more painterly look.
Many many layers of food coloring!
A few buttercream accents and some filler jelly beans later, it all came together. And voila!


My official entry into the contest! I love how it turned out! Here's a close-up of the screaming figure.

Monday, July 4, 2011

Fourth of July Cake!


Hello, all! I have been working on a couple of things, so there will be another cake post soon. I promise! Anyhoo, my beloved and I were invited to an Independence Day shindig this evening, so I volunteered to bring the dessert! I made this little strawberry cake and covered it with regular vanilla buttercream...


Then I scored the surface with a set of star-shaped cutters...
Be careful not to pull any icing off with the cutters!
Then I outlined the stars in either blue or red. A few stripes and dots later and voila!

I really like how this turned out! It's a simple but cute pattern, and it's fondant-free (however if you want to make the stars out of fondant, it wouldn't be much of a problem either). Here are some other angles...


Have a safe and happy Fourth of July, everyone!
Related Posts with Thumbnails