My beloved and I love celebrating Halloween. So we were definitely excited about going to a Halloween party. I figured I could make some cupcakes to bring along for everyone to enjoy. I made two different batches that were quite easy to make. Why? Well, they start with Duncan Hines cake mix. First, I started with these awesome-looking Wilton baking cups.
One batch was a white almond flavor (I used almond emulsion) with festive sprinkles mixed in.
Once baked, they had little orange and black specks in it! And they didn't end up crunchy, if anyone was wondering.
The second batch of cupcakes was a basic marble cake mix. After scooping out the one cup I needed to mix with the cocoa, I dyed the rest of the yellow cake batter orange.
Once the orange was scooped into the cups, I swirled in the chocolate, and voila!
I topped both with my butter-vanilla buttercream and added the remaining sprinkles for another festive touch and they ended up looking great both on the inside and out.
They were a definite hit at the party. And a sidenote: this could be done with Christmas Sprinkles as well (And just white cake mix dyed read and green and marbled together instead).
Feel free to email any news, videos, recipes, or just about anything to mysweetdiversion(at)hotmail(dot)com!
Sunday, October 31, 2010
Thursday, October 28, 2010
Pumpkin Carving!
To properly prepare ourselves for this Halloweekend, my beloved and I decided to carve pumpkins together! We had a carving kit that included patterns of varying levels, so I picked a pirate skull design (level 2 of 4) and he chose a wolves-howling-at-the-moon-fancy-pants design (level 4). We drew out and cut open the pumpkins, remembering to leave a notch so that we can match it up when re-capping the pumpkins.
We scooped out the "guts" with the scraping tool from the kit (reminiscent of a grapefruit spoon), then we taped our designs onto the pumpkins.
 |
| Mmmm pumpkin seeds! |
We removed the design. After that, you could either rub a bit of flour over the design to reveal the little dots better or just trace it with a pen (I recommend the pen... the flour gets a bit messy)
Then we cut away with our little saws!
 |
| Gotta hand it to him... lots of little details. Great work! |
I love carving pumpkins! It's one of my favorite Halloween traditions (along with dressing up in costumes and acting like a fool haha)
Today, it so happens to be my beloved's birthday. So, of course, I am making him a cake... But what kind??? Well, we'll just have to see...
Wednesday, October 20, 2010
What is This?!?!
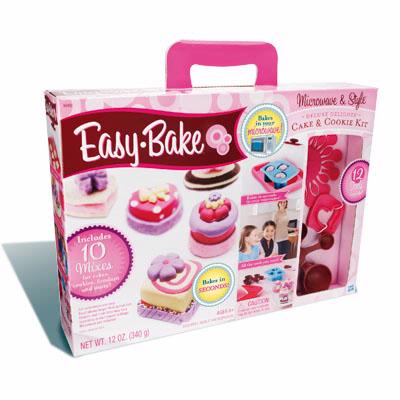
So I was looking through my Sunday paper the other day (yes, I know, it's Wednesday [I only get the Sunday paper and read the ads and articles over a couple days]), and I came across a coupon for an Easy-Bake-- but for the microwave. Now, I definitely had an Easy-Bake Oven growing up. I had the little pink oven that cooked tiny confections with a single light bulb. Behold a 90's model...
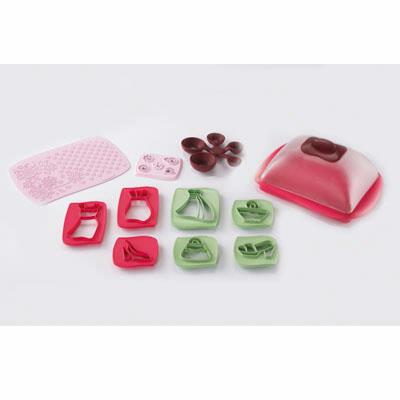
But, now-a-days, these kids these days don't even neeeeed an oven... They only need a "special dish" and a microwave.
According to the Hasbro website, this deluxe cake and cookie kit is approximately $29.99. There's a smaller kit with just cookies that is about $19.99. They come with icing mixes, fondant mixes, stampers, and cutters... I am kind of intrigued... I'm just curious about the taste, really... And how this mysterious dish works.
I'll keep you posted on whether or not I acquire this... I do have a $5 off coupon after all. It would be strictly for research, of course...
But, now-a-days, these kids these days don't even neeeeed an oven... They only need a "special dish" and a microwave.
 |
| courtesy hasbro.com |
 |
| Courtesy hasbro.com |
I'll keep you posted on whether or not I acquire this... I do have a $5 off coupon after all. It would be strictly for research, of course...
Saturday, October 16, 2010
Yours Truly is on a Roll-- a Blog Roll, That Is...
My Sweet Diversion has officially joined the Foodie Blog Roll! Behold the snazzy widget to the right. All food bloggers should be a part of it because it's an awesome community that helps you connect to other bloggers. There are contests, forums, news articles, and it even tracks the hits to your page! More info can be found here or by clicking around on the widget.
Tuesday, October 12, 2010
Golf Course Cupcakes!
This past Sunday (10.10.10!) was the birthday of my beloved's father. He is a HUGE Michigan University fan, but since they had lost their game the day before, I figured I'd make non-fail-reminder-cakes. He is also a golf-player, so I had a cute idea-- golf course cupcakes! I used 12 of the Yellow Almond cupcakes, and designed the tops to resemble a tiny golf course.
I used Wilton Leaf Green coloring to get that vibrant grassy green and a bit of fondant for the tee, golf ball, and hole.
The funnest part was dipping a few of the cupcakes in light brown sugar to make the "sand trap."
And here is some detail of my tiny golf course...
To be honest, I hadn't owned a grass tip until I had to make these cupcakes. I love it!!! I am determined to make spaghetti and meatballs cupcakes!
Saturday, October 9, 2010
Baking with an Emulsion
I like baking from scratch, but I also have a soft-spot for Duncan Hines cake mix. It seems to work a lot better for me as opposed to the other brands. Believe me, I've tried. I have cupcakes to make for my beloved's father's birthday, so I decided to go with a simple but tasty flavor: yellow almond cake. I would also mix almond flavor with white cake, if you wanted to go for a lighter, classier feel (wedding, perhaps?) Plus, adding extracts to cake mix is a fast and easy way to achieve a unique flavor without the fuss of trial and error.
So what is an emulsion? It is like an extract, except it is made with gum trag instead of alcohol. The flavor is much more intense, and its texture allows whatever your flavoring to maintain its consistency. For this recipe, I followed the mixing instructions, then put 2 tsp of almond emulsion in before I beat the batter for two minutes. I added about 1/2 teaspoon at a time, until I tasted the right amount.
 |
| Adding almondy-delicousness |
If you want to go super bold, go for a whole tablespoon. But beware! Adding too much can make your cake super overwhelming and have an odd berry/ cherry flavor.
 | |
| My kitchen was filled with such an amazing smell when these came out! |
I am debating between either making Michigan University cupcakes or golf-themed cupcakes. Michigan actually has a game going on tonight, so I don't want to make fail-cakes if they lose... that would NOT be cool... Plus, I think I have a cute idea for golf-cuppin' cakes anyway. I'll keep you posted!
Monday, October 4, 2010
Pumpkin-Oatmeal Chocolate Chip Cookies (with Walnuts)
The weather is still dreary, and I have some leftover pumpkin puree in my fridge, so I decided to play with more pumpkin ideas. I came up with Pumpkin-Oatmeal Chocolate Chip Cookies! I
2 c flour
1 c (two sticks) butter, room temperature
1 c oatmeal
1 c pumpkin puree
1 egg, beaten
1 tsp pumpkin pie spice (I decided to add this. Love it!)
1 tsp baking soda
1 tsp vanilla
1 c brown sugar (I used light brown sugar, and I didn't pack it... but feel free to pack it if you want your cookies a bit sweeter)
1/2 tsp salt
1 c chips or raisins (I used the semi-sweet chips from my cupcake recipe)
1 c chopped walnuts (I added these toooo)
1. Preheat oven to 350F.
2. Cream butter, brown sugar, egg, vanilla, and pumpkin puree.
3. Combine dry ingredients (including nuts and chips) in a separate medium bowl.
 |
| My dry ingredients with the walnuts standing by |
4. Add dry ingredients to pumpkin mixture and mix well (at about low-medium speed)
5. Spoon balls of dough evenly onto ungreased cookie sheets.
 |
| Oh, yeah. You love my seasoned cookie sheet on the right |
6. Bake for 10-12 minutes. Remove from pans and place on cooling racks to stop cooking process.

I cut the whole recipe in half (I beat the one egg and only used half as well), so I was able to make 15 tablespoon (cereal spoon)-sized cookies. They don't spread much while baking, so putting them about an inch or so apart on the cookie sheet is OK. I would guess that the recipe makes 4 dozen teaspoon (soup spoon)-sized cookies. They were so delicious, and they weren't overwhelmingly sweet. So which one did I like better? I must say, I enjoyed the one with walnuts. It added a nice crunchy texture. These would go perfectly with a cold glass of milk or the pumpkin spice coffee I recently acquired.
Enjoy!
 Pumpkin

Subscribe to:
Posts (Atom)


