Feel free to email any news, videos, recipes, or just about anything to mysweetdiversion(at)hotmail(dot)com!

Wednesday, November 23, 2011

Quick and Easy Thanksgiving Cupcakes


Today is the second annual ZS Thanksgiving. It is a time for the Zombie Squad to gather from near and far and spend quality time with each other while eating good food and drinking until merry. I, of course, was responsible for the dessert. I didn't have much time, so I went with a cake mix-based recipe that turned out as moist and delicious as a scratch-made recipe. I also needed to find an alternative to cream cheese buttercream, since some people attending the feast have dietary restrictions. I searched through my notebook of flavor ideas and found Honey-Ginger Buttercream. The recipe for the cupcakes are as follows:
  • 1 box Duncan Hines space cake mix
  • 1 box (3.4oz) Jello Pumpkin Spice pudding mix
  • 2 large eggs
  • 1 cup water
  • 1 cup canned pumpkin
1) Preheat the oven at 350 and place paper cups in cupcake pan.
2) Mix all ingredients for 30 seconds on low, then stop and scrape down the sides of the bowl (as well as the paddle). Continue to mix for 2 minutes on medium. Scoop 1/4 cup of mixture into each baking cup.
3) Bake for 18 to 23 minutes or until a butter knife comes out clean.


Yummy!
While the cupcakes were cooling, I started on the Honey-Ginger Buttercream. The recipe I used makes about 4 cups of icing, which is just enough to make 24 roses with leaves.
  • 1 1/2 cups (3 sticks) butter, softened
  • 2 cups powdered sugar
  • 1 cup honey
  • 2 tsp freshly grated ginger
  • 1 tsp vanilla extract
1) Beat the butter until creamy, then add the powdered sugar and beat on high until smooth.

2) Add the honey and ginger.
Love the smell of fresh ginger!
*spray the measuring cup with pan release before measuring your honey!*
3) Beat for another minute or so before adding the vanilla. Then continue to beat on high for 3-4 minutes until nice and fluffy.
The consistency of the buttercream is kind of like a stiff Swiss Meringue without all the muscle involved. So it was perfect to hold a rose shape.
And 23 more...

After I made all of the roses I needed, I used the rest to make leaves. It worked out perfectly, and I didn't have much buttercream left over.

I only used two teaspoons of ginger because I didn't want the flavor of the ginger to overwhelm the honey flavor. Feel free to add another teaspoon if you're feeling spicy!

And of course these cupcakes aren't specifically for Thanksgiving. They are perfect for any fall occasion, or if you're a pumpkin-hoarder like me, they are perfect for any time of the year!

Happy Thanksgiving, everyone! (and have a safe Black Friday!)

Sunday, November 20, 2011

Thomas the Tank Engine Cake!


Hello, all! For the longest time, I thought Thomas was just a train. But apparently, a tank engine and a train are two different things. It has to do with the fact that he doesn't have a coal car. Interesting... You're welcome, by the way! :)

Last weekend, I had the honor of making the birthday cake for my pseudo- nephew, Logan. He turned two, and he had a Thomas the Tank Engine theme to his party. The cake was a vanilla half sheet cake with vanilla buttercream. I looked up a basic Thomas image to use as reference. Then I used my trusty fondant tool to score the design on. I went to work filling in with the appropriate colors, making sure to smooth the surface with a small offset spatula. I also changed his signature number "1" to a "2"!
Everyone at the party loved it, and I'm glad the cake got approval from Logan's sisters, Gabby and Sabrina. :) I'm sure Logan liked the cake, but he was definitely more a fan of the bounce house in the backyard. And that's OK with me because that thing looked fun! Are there any bounce houses for grown-ups out there...?

Friday, November 18, 2011

Pumpkin Spice Rice Krispies Treats


Good evening, all! (And evening is arriving so early these days!) I wanted to share this delicious recipe I found on my new obsession-- Pinterest! For those of you who have never heard of it, Pinterest is a virtual bulletin board site where you grab photos (or "pins") of things you like and categorize them onto different "boards." I love it! I have a board specifically named "My Pumpkin Obsession," and I decided to make one of my pins- Pumpkin Spice Rice Krispies Treats!

I've eaten Rice Krispies treats most of my life (one of my favorite snacks!) so I wanted to mash it with my favorite flavor- pumpkin! The following recipe is for 12 servings, but I cut everything in half for just 6 bars. I also used my handy dandy Wilton Square muffin pan so I can create perfect squares without having to cut them out.

  • 3 Tbsp unsalted butter
  • 1/4 c pumpkin
  • 1-10 oz bag mini marhsmallows + 1 cup
  • 1/4 tsp vanilla extract
  • pinch of all spice
  • pinch of nutmeg
  • pinch of salt
  • 6 cups Rice Krispies
1) Melt the butter over medium-low heat. Then add the pumpkin and warm it through.
 2) Stir in the 10 oz bag of marshmallows and melt. Then stir in the vanilla, cinnamon, all spice, nutmeg, and salt and remove from the heat.
 3) Cool for 10 minutes and fold in the remaining cup of marshmallows. Add Rice Krispies.
 4) Press into a greased 9 x 13 pan and let set for about 20 minutes then cut into squares.
*or press into your square muffin pan!*
And voila!

These were as amazing as I thought they'd be! My brother snuck one and he loved it! Then he snuck another!

One thing I would probably change is the addition of the whole marshmallows at the end. The next time I try this recipe, I'll see how it is with all of the marshmallows melted at the same time.

Oh, feel free to pin me!

Sunday, November 13, 2011

Stuffed Animal Baby Shower Cake

Hello, again! I've finally had a chance to relax this weekend after much running around! I went to a friend's welcome-home gathering, I threw my first Pampered Chef party, and I went to a special little guy's second birthday party. There was a birthday cake and some sweet treats made, so I'll definitely get to that soon!

But first, I wanted to post about a baby shower cake I recently made. It was meant for an old coworker and a good friend of mine who was having her fourth baby! I decided I could design the cake after the invitation, since it had both pink and blue in it.
 I started with an 8" vanilla cake with vanilla buttercream tinted yellow. On top, I put the stuffed lion on a green background.
Then I placed the bunny and the bear on the sides (because they couldn't fit on the top!)
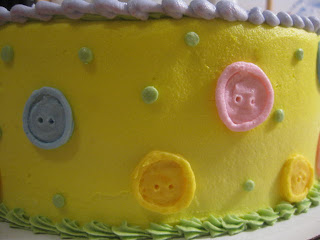
And to fill up the space on the rest of the cake, I added some cute little buttons on the side with some dots. I think they worked out nicely!
After I added the borders, the cake was almost complete! I had to refrigerate the cake for about half an hour in order for the buttercream to set. Then I took my fondant tool (it snuck into the first photo up there) and made holes in the buttons as well as little "stitches" on the stuffed animals.

Aaaand here it is all together!

My friend loved the cake as did all of the ladies at the baby shower. They wanted me to "do the honors" of cutting it, but I just couldn't! (I'm working on finding the strength to cut my own cakes!)

The baby shower was a surprise, so it was nice to see the look on her face when she saw all of the baby shower decorations and gifts! It was also nice to reconnect with the other ladies who I also worked with. Unfortunately, the conversation quickly turned into delivery room horror stories, which had me reconsidering having children someday. Yech!

Tuesday, November 8, 2011

Metal Hello Kitty Cake


  Greetings, everyone! I am back with another birthday cake, and this time it's uber- metal!! Rawwwr!

...And super cute! :)

So how did this cake come about? Weeell...

My good friend, Bob (who is the bassist in my Betrothed's metal band, The Omega Point), had a birthday this past weekend. Now, Bob is known as a metal enthusiast-- he has hundreds of metal CDs! And he has super long metal hair and wears black 99% of the time. So of course, I just had to make him a metal birthday cake worthy of his approval- with a bit of cute mixed in just to mess with him. OK-- a lot of cute mixed in. And who's cuter than Hello Kitty?!

I started with an orange-almond vanilla cake and iced it in butter almond buttercream. I added a layer of dark grey on top then added pearl borders. Then I made the basic Hello Kitty head shape out of white buttercream and added the signature bow, but black (like her soul mwhahaha). And, of course, I added some corpse paint (definitely had to look that up) to her eyes, piercings and a spiked collar.
I used a tip #5 to get the spikes!

 Once Bob opened the cake box, he heartily laughed, so I'm glad he liked it!

Perhaps next year, for his big 3-0, I'll make him a brvtal unicorn cake! \m/

Sunday, November 6, 2011

Subway Sub Cake

Hello, all! This new cake here reminds me of the many years I spent working in a deli. It all started when I worked at Schlotzksy's Deli for about four years (my first job), then I also worked in the deli department at Harris Teeter (a grocery store chain on the east coast). I must say, making this cake was much more fun than putting together a real sandwich!

I started with a marble cake baked in a quarter sheet pan. I cut the cake in half lengthwise to create a top bun and a bottom bun. I iced the bottom bun in a light brown buttercream (just a basic vanilla) and also iced the top, so that the "toppings" would have something to stick to. I cut up little pieces of pink "ham" and folded it over like they do at Subway (or most delis, really). Then added a layer of buttercream for "mayonnaise."
Then I rolled out green fondant and shredded it up to represent my lettuce.
Next came the tomato slices. I rolled out 1/4-inch thick red fondant and cut whole circles. Then I cut the circles in half and used a Wilton tip 101 to add seed detail.
I added a couple of "yellow American" slices (brushed with vanilla flavor to give it a shine) and I was ready to put the top bun on.
I also added some brown food coloring the edges of the ham!
As for the board, I covered it in Subway paper, but I also glued a crumpled wrapper on it to make the cake appear like a freshly-opened sammich.

Even though those deli jobs weren't my favorite, I met a lot of awesome people that I'm still in touch with, and that's much more important. :)

Tuesday, November 1, 2011

Day of the Dead Cake!

Hello, all! As some of you may know, October 31st through November 2nd is deemed El Dia de Los Muertos (or Day of the Dead). It's a holiday of Mexican origin that focuses on remembering loved ones that have passed. One big (and recognizable) characteristic of this holiday is the intricately-decorated sugar skull.

I wanted to capture that in my Beloved's birthday cake, since his birthday is so close to Halloween and the Day of the Dead celebration. After looking up many different beautiful designs, I settled on a red and black style that incorporated scroll work and spider webs. I started with a basic chocolate cake and filled it with cookies and cream (Oreos crushed up and mixed into vanilla buttercream). Yum!

I also wanted to add a topping of ganache, so I looked up a recipe and got to work! I started with 12 ounces of semi sweet chocolate chips in a bowl and 1 cup of heavy cream on medium high in a saucepan.

Then I waited until the cream came to a boil...
Then I poured the boiling cream onto the chocolate chips!
 And I stirred until the chocolate completely melted and had a glossy finish.
Yum!
 I ran the ganache through a strainer just to get the little bits out.

Then I poured the chocolate over the cake that I had put the scroll detail on already.
I added a fondant sugar skull on top, some white chocolate numbers, and it was ready to be devoured by my Betrothed!
He loved it!

And so did everyone else at the party! :)
Mmmm so good with vanilla ice cream
Related Posts with Thumbnails